
diff options
Diffstat (limited to 'docs/guides/step-by-step/step-10.md')
| -rw-r--r-- | docs/guides/step-by-step/step-10.md | 230 |
1 files changed, 230 insertions, 0 deletions
diff --git a/docs/guides/step-by-step/step-10.md b/docs/guides/step-by-step/step-10.md new file mode 100644 index 000000000..28ab47c67 --- /dev/null +++ b/docs/guides/step-by-step/step-10.md @@ -0,0 +1,230 @@ +<!-- +title: "Step 10. Set up a proxy" +custom_edit_url: https://github.com/netdata/netdata/edit/master/docs/guides/step-by-step/step-10.md +--> + +# Step 10. Set up a proxy + +You're almost through! At this point, you should be pretty familiar with now Netdata works and how to configure it to +your liking. + +In this step of the guide, we're going to add a proxy in front of Netdata. We're doing this for both improved +performance and security, so we highly recommend following these steps. Doubly so if you installed Netdata on a +publicly-accessible remote server. + +> ❗ If you installed Netdata on the machine you're currently using (e.g. on `localhost`), and have been accessing +> Netdata at `http://localhost:19999`, you can skip this step of the guide. In most cases, there is no benefit to +> setting up a proxy for a service running locally. + +> ❗❗ This guide requires more advanced administration skills than previous parts. If you're still working on your +> Linux administration skills, and would rather get back to Netdata, you might want to [skip this +> step](step-99.md) for now and return to it later. + +## What you'll learn in this step + +In this step of the Netdata guide, you'll learn: + +- [What a proxy is and the benefits of using one](#wait-whats-a-proxy) +- [How to connect Netdata to Nginx](#connect-netdata-to-nginx) +- [How to enable HTTPS in Nginx](#enable-https-in-nginx) +- [How to secure your Netdata dashboard with a password](#secure-your-netdata-dashboard-with-a-password) + +Let's dive in! + +## Wait. What's a proxy? + +A proxy is a middleman between the internet and a service you're running on your system. Traffic from the internet at +large enters your system through the proxy, which then routes it to the service. + +A proxy is often used to enable encrypted HTTPS connections with your browser, but they're also useful for load +balancing, performance, and password-protection. + +We'll use [Nginx](https://nginx.org/en/) for this step of the guide, but you can also use +[Caddy](https://caddyserver.com/) as a simple proxy if you prefer. + +## Required before you start + +You need three things to run a proxy using Nginx: + +- Nginx and Certbot installed on your system +- A fully qualified domain name +- A subdomain for Netdata that points to your system + +### Nginx and Certbot + +This step of the guide assumes you can install Nginx on your system. Here are the easiest methods to do so on Debian, +Ubuntu, Fedora, and CentOS systems. + +```bash +sudo apt-get install nginx # Debian/Ubuntu +sudo dnf install nginx # Fedora +sudo yum install nginx # CentOS +``` + +Check out [Nginx's installation +instructions](https://docs.nginx.com/nginx/admin-guide/installing-nginx/installing-nginx-open-source/) for details on +other Linux distributions. + +Certbot is a tool to help you create and renew certificate+key pairs for your domain. Visit their +[instructions](https://certbot.eff.org/instructions) to get a detailed installation process for your operating system. + +### Fully qualified domain name + +The only other true prerequisite of using a proxy is a **fully qualified domain name** (FQDN). In other words, a domain +name like `example.com`, `netdata.cloud`, or `github.com`. + +If you don't have a domain name, you won't be able to use a proxy the way we'll describe here. + +Because we strongly recommend running Netdata behind a proxy, the cost of a domain name is worth the benefit. If you +don't have a preferred domain registrar, try [Google Domains](https://domains.google/), +[Cloudflare](https://www.cloudflare.com/products/registrar/), or [Namecheap](https://www.namecheap.com/). + +### Subdomain for Netdata + +Any of the three domain registrars mentioned above, and most registrars in general, will allow you to create new DNS +entries for your domain. + +To create a subdomain for Netdata, use your registrar's DNS settings to create an A record for a `netdata` subdomain. +Point the A record to the IP address of your system. + +Once finished with the steps below, you'll be able to access your dashboard at `http://netdata.example.com`. + +## Connect Netdata to Nginx + +The first part of enabling the proxy is to create a new server for Nginx. + +Use your favorite text editor to create a file at `/etc/nginx/sites-available/netdata`, copy in the following +configuration, and change the `server_name` line to match your domain. + +```nginx +upstream backend { + server 127.0.0.1:19999; + keepalive 64; +} + +server { + listen 80; + + # Change `example.com` to match your domain name. + server_name netdata.example.com; + + location / { + proxy_set_header X-Forwarded-Host $host; + proxy_set_header X-Forwarded-Server $host; + proxy_set_header X-Forwarded-For $proxy_add_x_forwarded_for; + proxy_pass http://backend; + proxy_http_version 1.1; + proxy_pass_request_headers on; + proxy_set_header Connection "keep-alive"; + proxy_store off; + } +} +``` + +Save and close the file. + +Test your configuration file by running `sudo nginx -t`. + +If that returns no errors, it's time to make your server available. Run the command to create a symbolic link in the +`sites-enabled` directory. + +```bash +sudo ln -s /etc/nginx/sites-available/netdata /etc/nginx/sites-enabled/netdata +``` + +Finally, restart Nginx to make your changes live. Open your browser and head to `http://netdata.example.com`. You should +see your proxied Netdata dashboard! + +## Enable HTTPS in Nginx + +All this proxying doesn't mean much if we can't take advantage of one of the biggest benefits: encrypted HTTPS +connections! Let's fix that. + +Certbot will automatically get a certificate, edit your Nginx configuration, and get HTTPS running in a single step. Run +the following: + +```bash +sudo certbot --nginx +``` + +> See this error after running `sudo certbot --nginx`? +> +> ``` +> Saving debug log to /var/log/letsencrypt/letsencrypt.log +> The requested nginx plugin does not appear to be installed` +> ``` +> +> You must install `python-certbox-nginx`. On Ubuntu or Debian systems, you can run `sudo apt-get install +> python-certbot-nginx` to download and install this package. + +You'll be prompted with a few questions. At the `Which names would you like to activate HTTPS for?` question, hit +`Enter`. Next comes this question: + +```bash +Please choose whether or not to redirect HTTP traffic to HTTPS, removing HTTP access. +- - - - - - - - - - - - - - - - - - - - - - - - - - - - - - - - - - - - - - - - +1: No redirect - Make no further changes to the webserver configuration. +2: Redirect - Make all requests redirect to secure HTTPS access. Choose this for +new sites, or if you're confident your site works on HTTPS. You can undo this +change by editing your web server's configuration. +- - - - - - - - - - - - - - - - - - - - - - - - - - - - - - - - - - - - - - - - +``` + +You _do_ want to force HTTPS, so hit `2` and then `Enter`. Nginx will now ensure all attempts to access +`netdata.example.com` use HTTPS. + +Certbot will automatically renew your certificate whenever it's needed, so you're done configuring your proxy. Open your +browser again and navigate to `https://netdata.example.com`, and you'll land on an encrypted, proxied Netdata dashboard! + +## Secure your Netdata dashboard with a password + +Finally, let's take a moment to put your Netdata dashboard behind a password. This step is optional, but you might not +want _anyone_ to access the metrics in your proxied dashboard. + +Run the below command after changing `user` to the username you want to use to log in to your dashboard. + +```bash +sudo sh -c "echo -n 'user:' >> /etc/nginx/.htpasswd" +``` + +Then run this command to create a password: + +```bash +sudo sh -c "openssl passwd -apr1 >> /etc/nginx/.htpasswd" +``` + +You'll be prompted to create a password. Next, open your Nginx configuration file at +`/etc/nginx/sites-available/netdata` and add these two lines under `location / {`: + +```nginx + location / { + auth_basic "Restricted Content"; + auth_basic_user_file /etc/nginx/.htpasswd; + ... +``` + +Save, exit, and restart Nginx. Then try visiting your dashboard one last time. You'll see a prompt for the username and +password you just created. + +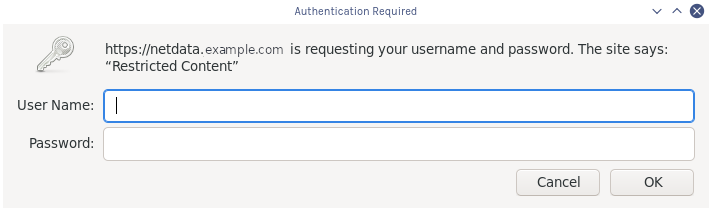 + +Your Netdata dashboard is now a touch more secure. + +## What's next? + +You're a real sysadmin now! + +If you want to configure your Nginx proxy further, check out the following: + +- [Running Netdata behind Nginx](/docs/Running-behind-nginx.md) +- [How to optimize Netdata's performance](/docs/guides/configure/performance.md) +- [Enabling TLS on Netdata's dashboard](/web/server/README.md#enabling-tls-support) + +And... you're _almost_ done with the Netdata guide. + +For some celebratory emoji and a clap on the back, head on over to our final step. + +[Next: The end. →](step-99.md) + +[](<>) |