1
2
3
4
5
6
7
8
9
10
11
12
13
14
15
16
17
18
19
20
21
22
23
24
25
26
27
28
29
30
31
32
33
34
35
36
37
38
39
40
41
42
43
44
45
46
47
48
49
50
51
52
53
54
55
56
57
58
59
60
61
62
63
64
65
66
67
68
69
70
71
72
73
74
75
76
77
78
79
80
81
82
83
84
85
86
87
88
89
90
91
92
93
94
95
96
97
98
99
100
101
102
103
104
105
106
107
108
109
110
111
112
113
114
115
116
117
118
119
120
121
122
123
124
125
126
127
128
129
130
131
132
133
134
135
136
137
138
139
140
141
142
143
144
|
<!--
title: "Step 4. The basics of configuring Netdata"
date: 2020-03-31
custom_edit_url: https://github.com/netdata/netdata/edit/master/docs/guides/step-by-step/step-04.md
-->
# Step 4. The basics of configuring Netdata
Welcome to the fourth step of the Netdata guide.
Since the beginning, we've covered the building blocks of Netdata, dashboard basics, and how you can monitor many
individual systems using many distributed Netdata agents.
Next up: configuration.
## What you'll learn in this step
We'll talk about Netdata's default configuration, and then you'll learn how to do the following:
- [Find your `netdata.conf` file](#find-your-netdataconf-file)
- [Use edit-config to open `netdata.conf`](#use-edit-config-to-open-netdataconf)
- [Navigate the structure of `netdata.conf`](#the-structure-of-netdataconf)
- [Edit your `netdata.conf` file](#edit-your-netdataconf-file)
## Find your `netdata.conf` file
Netdata primarily uses the `netdata.conf` file to configure its core functionality. `netdata.conf` resides within your
**Netdata config directory**.
The location of that directory and `netdata.conf` depends on your operating system and the method you used to install
Netdata.
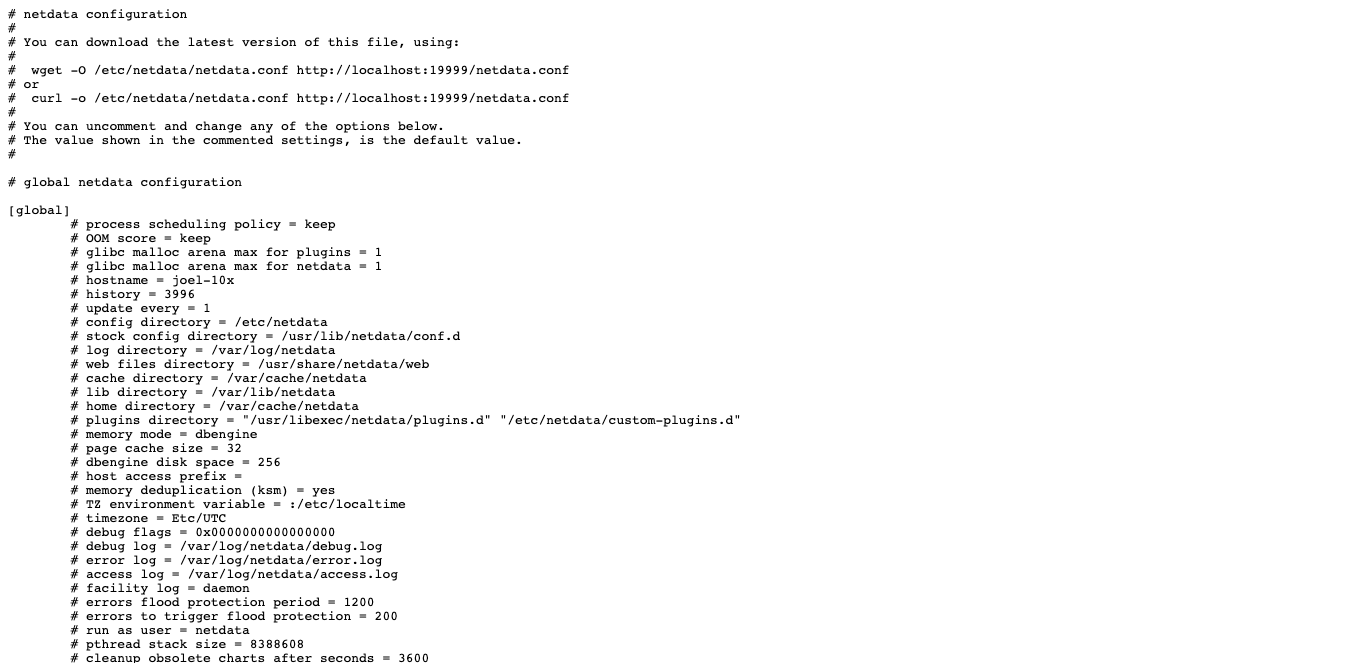
The most reliable method of finding your Netdata config directory is loading your `netdata.conf` on your browser. Open a
tab and navigate to `http://HOST:19999/netdata.conf`. Your browser will load a text document that looks like this:

Look for the line that begins with `# config directory = `. The text after that will be the path to your Netdata config
directory.
In the system represented by the screenshot, the line reads: `config directory = /etc/netdata`. That means
`netdata.conf`, and all the other configuration files, can be found at `/etc/netdata`.
> For more details on where your Netdata config directory is, take a look at our [installation
> instructions](/packaging/installer/README.md).
For the rest of this guide, we'll assume you're editing files or running scripts from _within_ your **Netdata
configuration directory**.
## Use edit-config to open `netdata.conf`
Inside your Netdata config directory, there is a helper scripted called `edit-config`. This script will open existing
Netdata configuration files using a text editor. Or, if the configuration file doesn't yet exist, the script will copy
an example file to your Netdata config directory and then allow you to edit it before saving it.
> `edit-config` will use the `EDITOR` environment variable on your system to edit the file. On many systems, that is
> defaulted to `vim` or `nano`. We highly recommend `nano` for beginners. To change this variable for the current
> session (it will revert to the default when you reboot), export a new value: `export EDITOR=nano`. Or, [make the
> change permanent](https://stackoverflow.com/questions/13046624/how-to-permanently-export-a-variable-in-linux).
Let's give it a shot. Navigate to your Netdata config directory. To use `edit-config` on `netdata.conf`, you need to
have permissions to edit the file. On Linux/macOS systems, you can usually use `sudo` to elevate your permissions.
```bash
cd /etc/netdata # Replace this path with your Netdata config directory, if different as found in the steps above
sudo ./edit-config netdata.conf
```
You should now see `netdata.conf` your editor! Let's walk through how the file is structured.
## The structure of `netdata.conf`
There are two main parts of the file to note: **sections** and **options**.
The `netdata.conf` file is broken up into various **sections**, such as `[global]`, `[web]`, and `[registry]`. Each
section contains the configuration options for some core component of Netdata.
Each section also contains many **options**. Options have a name and a value. With the option `config directory =
/etc/netdata`, `config directory` is the name, and `/etc/netdata` is the value.
Most lines are **commented**, in that they start with a hash symbol (`#`), and the value is set to a sane default. To
tell Netdata that you'd like to change any option from its default value, you must **uncomment** it by removing that
hash.
### Edit your `netdata.conf` file
Let's try editing the options in `netdata.conf` to see how the process works.
First, add a fake option to show you how Netdata loads its configuration files. Add a `test` option under the `[global]`
section and give it the value of `1`.
```conf
[global]
test = 1
```
Restart Netdata with `service restart netdata` or the [appropriate
alternative](/docs/getting-started.md#start-stop-and-restart-netdata) for your system.
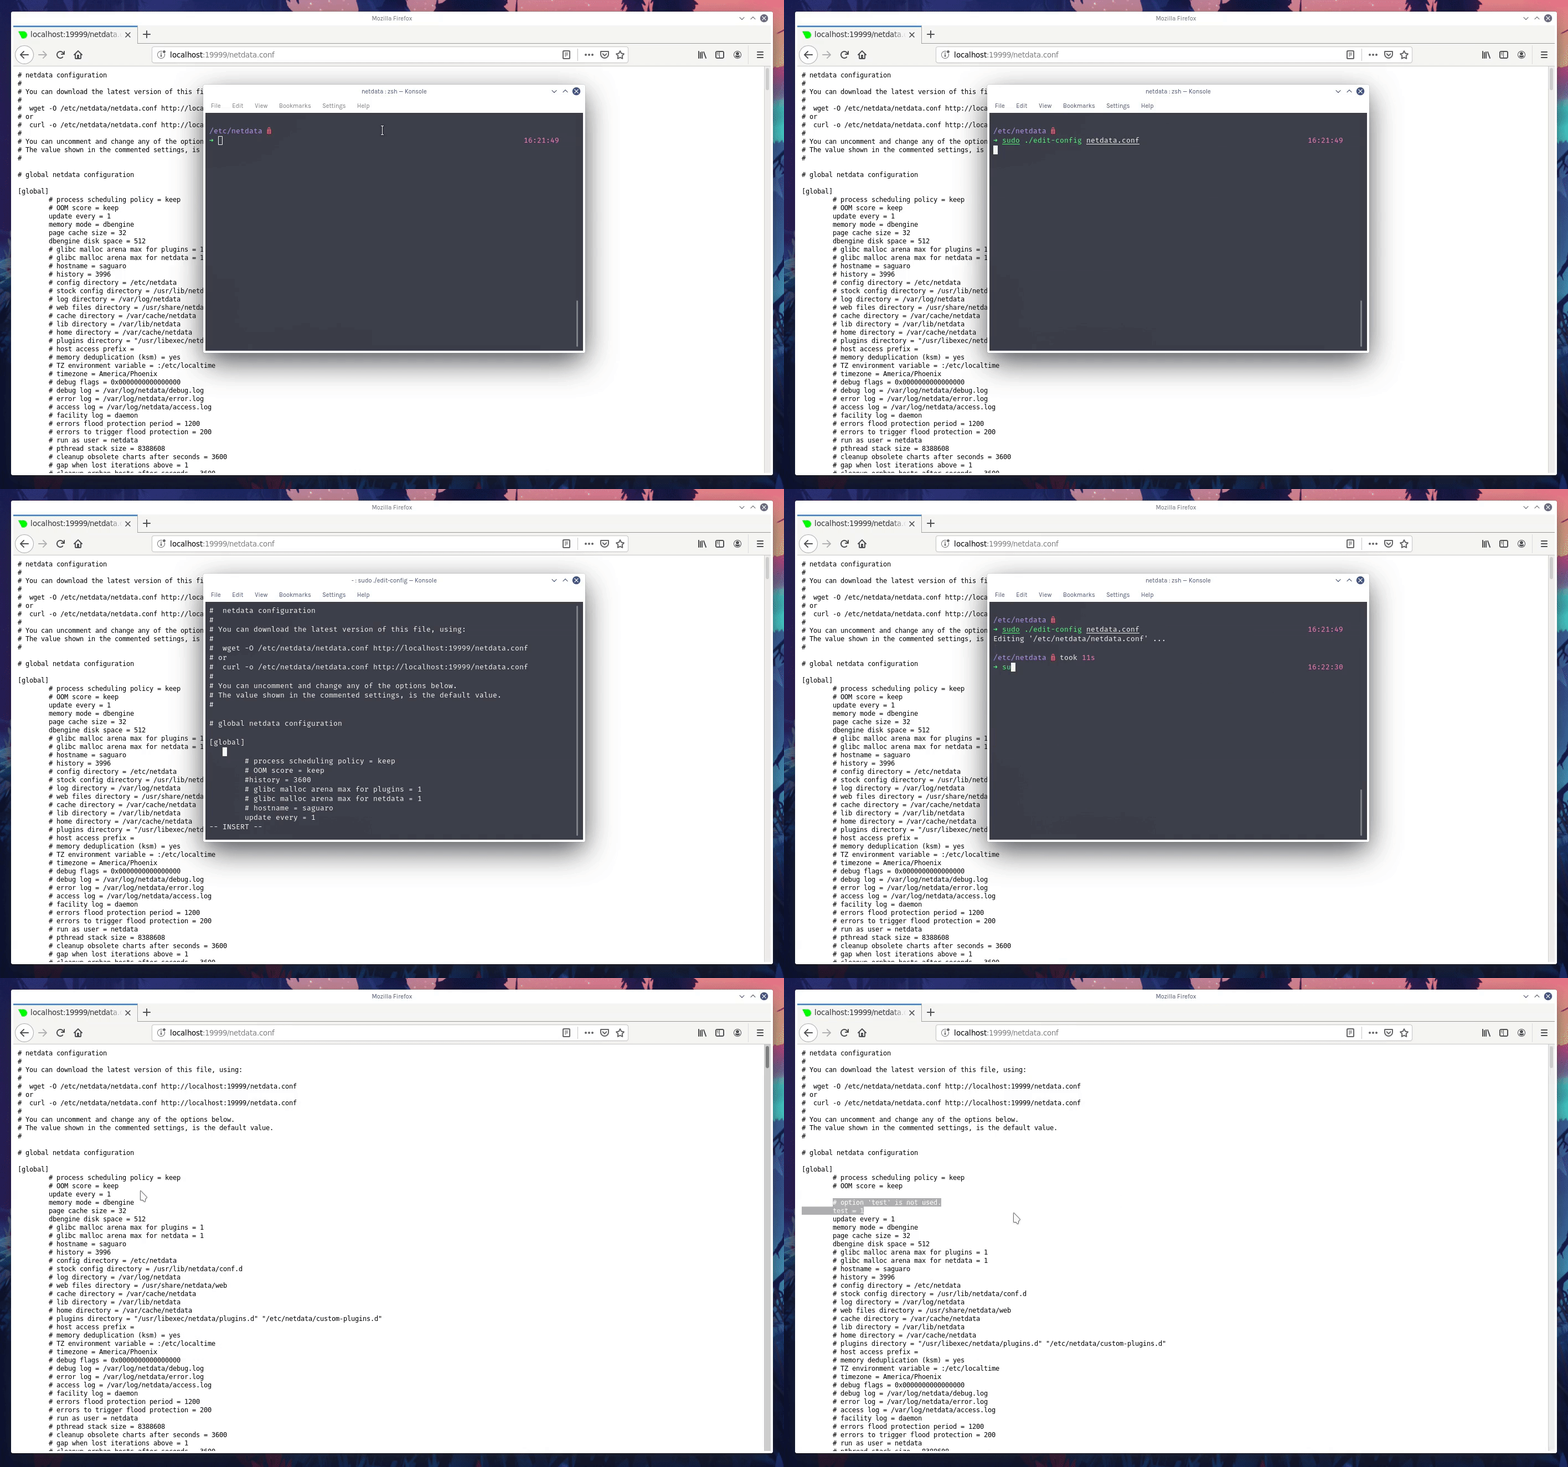
Now, open up your browser and navigate to `http://HOST:19999/netdata.conf`. You'll see that Netdata has recognized
that our fake option isn't valid and added a notice that Netdata will ignore it.
Here's the process in GIF form!

Now, let's make a slightly more substantial edit to `netdata.conf`: change the Agent's name.
If you edit the value of the `hostname` option, you can change the name of your Netdata Agent on the dashboard and a
handful of other places, like the Visited nodes menu _and_ Netdata Cloud.
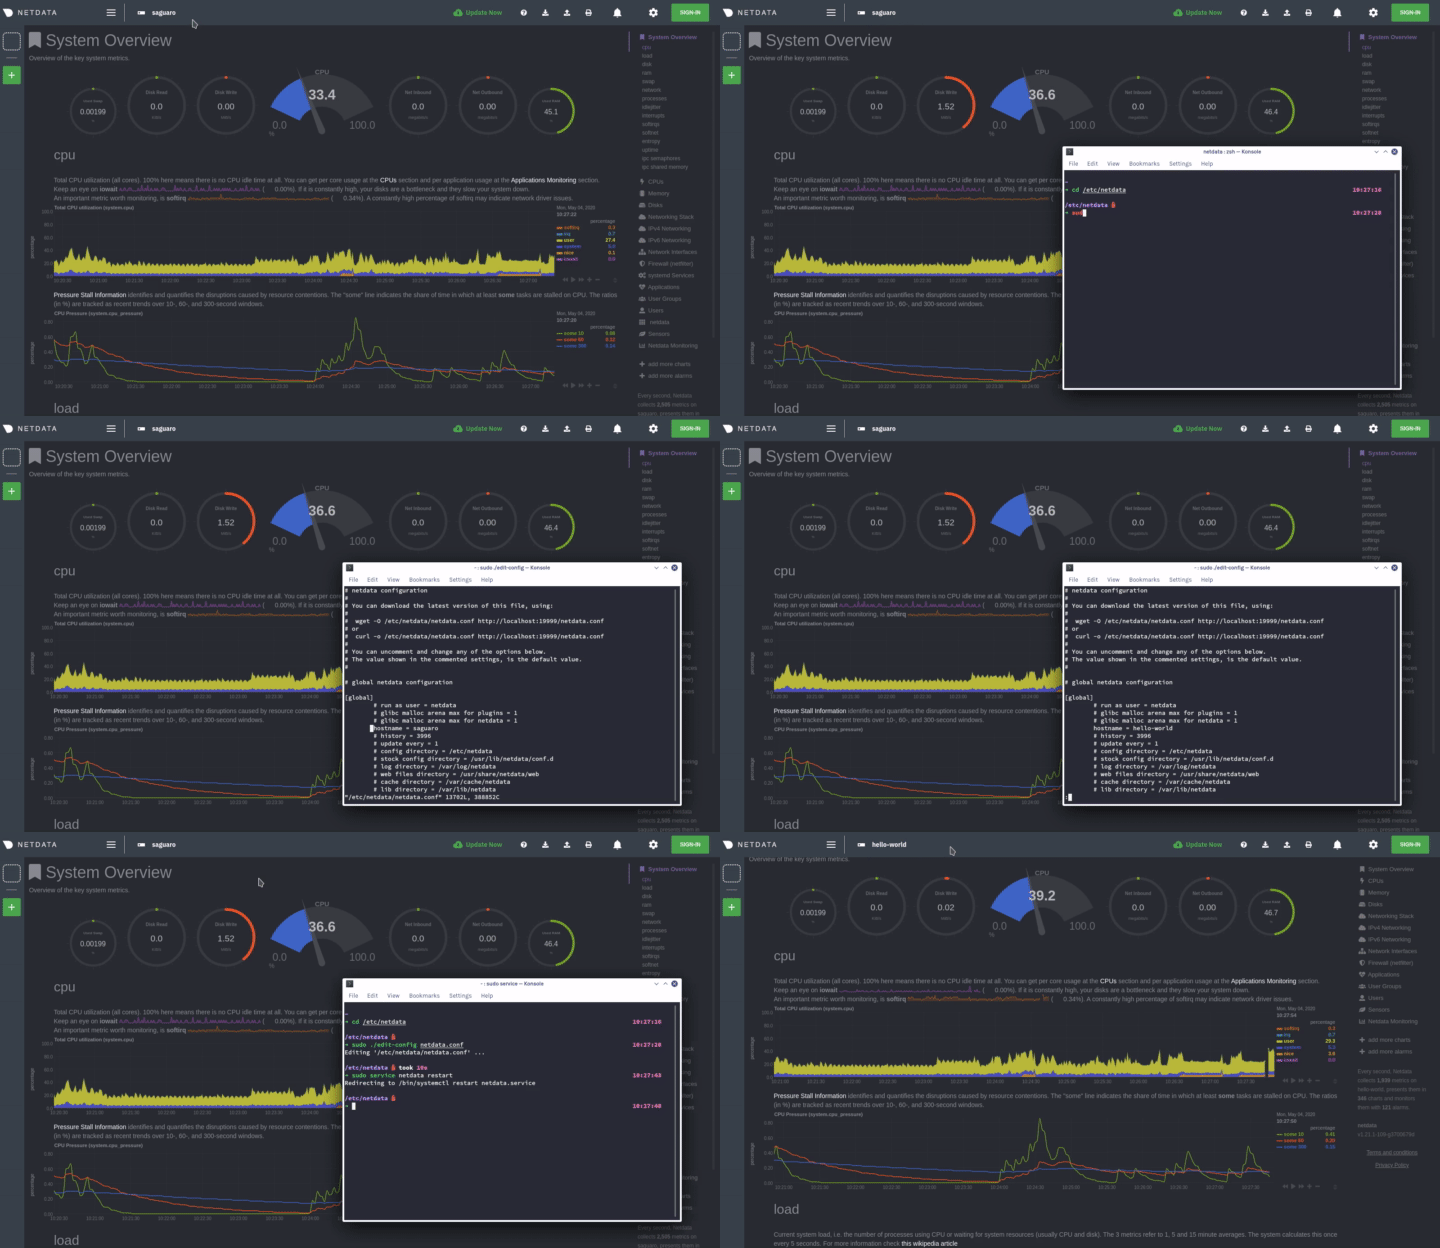
Use `edit-config` to change the `hostname` option to a name like `hello-world`. Be sure to uncomment it!
```conf
[global]
hostname = hello-world
```
Once you're done, restart Netdata and refresh the dashboard. Say hello to your renamed agent!

Netdata has dozens upon dozens of options you can change. To see them all, read our [daemon
configuration](/daemon/config/README.md), or hop into our popular guide on [increasing long-term metrics
storage](/docs/guides/longer-metrics-storage.md).
## What's next?
At this point, you should be comfortable with getting to your Netdata directory, opening and editing `netdata.conf`, and
seeing your changes reflected in the dashboard.
Netdata has many more configuration files that you might want to change, but we'll cover those in the following steps of
this guide.
In the next step, we're going to cover one of Netdata's core functions: monitoring the health of your systems via alarms
and notifications. You'll learn how to disable alarms, create new ones, and push notifications to the system of your
choosing.
[Next: Health monitoring alarms and notifications →](step-05.md)
[](<>)
|
