
diff options
Diffstat (limited to 'docs/cloud')
| -rw-r--r-- | docs/cloud/alerts-notifications/add-rocketchat-notification-configuration.md | 49 | ||||
| -rw-r--r-- | docs/cloud/manage/invite-your-team.md | 24 | ||||
| -rw-r--r-- | docs/cloud/manage/organize-your-infrastrucutre-invite-your-team.md | 169 | ||||
| -rw-r--r-- | docs/cloud/manage/plans.md | 2 | ||||
| -rw-r--r-- | docs/cloud/netdata-assistant.md | 20 | ||||
| -rw-r--r-- | docs/cloud/netdata-functions.md | 1 | ||||
| -rw-r--r-- | docs/cloud/spaces.md | 79 | ||||
| -rw-r--r-- | docs/cloud/visualize/dashboards.md | 2 | ||||
| -rw-r--r-- | docs/cloud/visualize/kubernetes.md | 2 | ||||
| -rw-r--r-- | docs/cloud/visualize/nodes.md | 6 | ||||
| -rw-r--r-- | docs/cloud/war-rooms.md | 60 |
11 files changed, 245 insertions, 169 deletions
diff --git a/docs/cloud/alerts-notifications/add-rocketchat-notification-configuration.md b/docs/cloud/alerts-notifications/add-rocketchat-notification-configuration.md new file mode 100644 index 000000000..6a81ad1d7 --- /dev/null +++ b/docs/cloud/alerts-notifications/add-rocketchat-notification-configuration.md @@ -0,0 +1,49 @@ +# Add RocketChat notification configuration + +From the Cloud interface, you can manage your space's notification settings and from these you can add a specific configuration to get notifications delivered on RocketChat. + +## Prerequisites + +To add RocketChat notification configurations you need: + +- A Netdata Cloud account +- Access to the space as an **administrator** +- Space needs to be on **Business** plan or higher +- Have a RocketChat app on your workspace to receive the webhooks, for more details check [how to configure this on RocketChat](#settings-on-rocketchat) + +## Steps + +1. Click on the **Space settings** cog (located above your profile icon) +1. Click on the **Notification** tab +1. Click on the **+ Add configuration** button (near the top-right corner of your screen) +1. On the **RocketChat** card click on **+ Add** +1. A modal will be presented to you to enter the required details to enable the configuration: + 1. **Notification settings** are Netdata specific settings + - Configuration name - you can optionally provide a name for your configuration you can easily refer to it + - Rooms - by specifying a list of Rooms you are select to which nodes or areas of your infrastructure you want to be notified using this configuration + - Notification - you specify which notifications you want to be notified using this configuration: All Alerts and unreachable, All Alerts, Critical only + 1. **Integration configuration** are the specific notification integration required settings, which vary by notification method. For RocketChat: + - Webhook URL - URL provided on RocketChat for the channel you want to receive your notifications. For more details check [how to configure this on RocketChat](#settings-on-rocketchat) + +## Settings on RocketChat + +To enable the webhook integrations on RocketChat you need: +1. In RocketChat, Navigate to Administration > Workspace > Integrations. + +2. Click +New at the top right corner. + +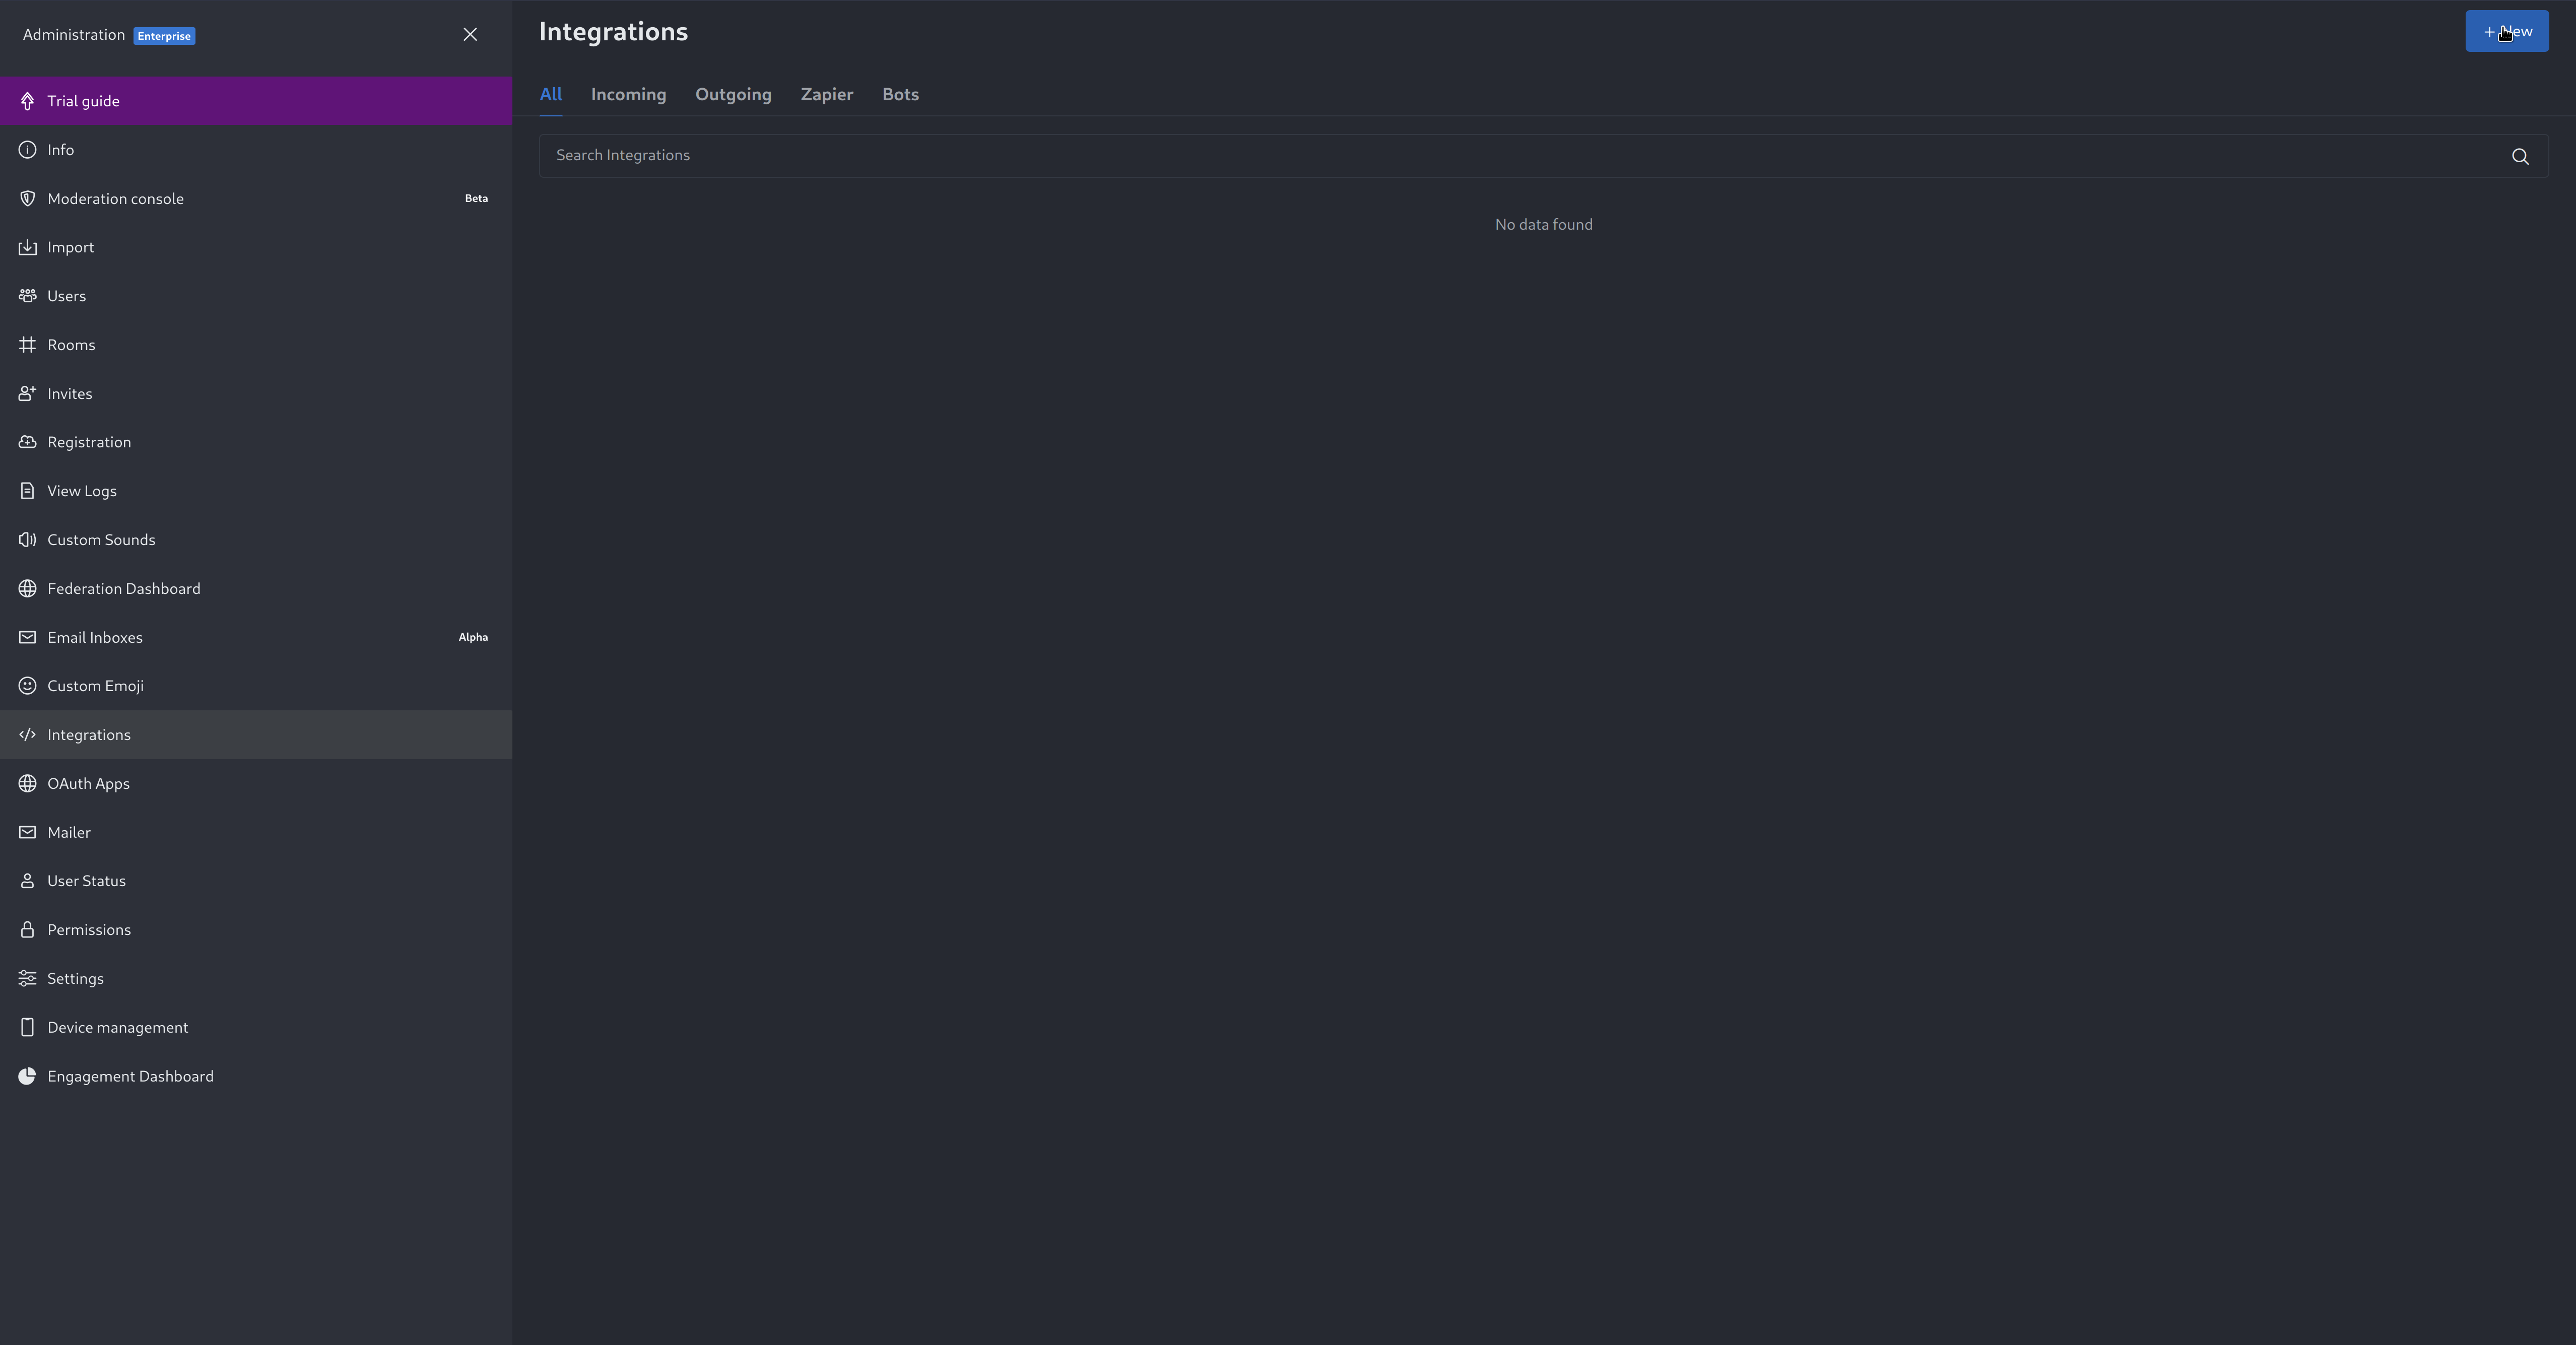 + +3. For more details about each parameter, check [create-a-new-incoming-webhook](https://docs.rocket.chat/use-rocket.chat/workspace-administration/integrations#create-a-new-incoming-webhook). + +4. After configuring integration, click Save. + +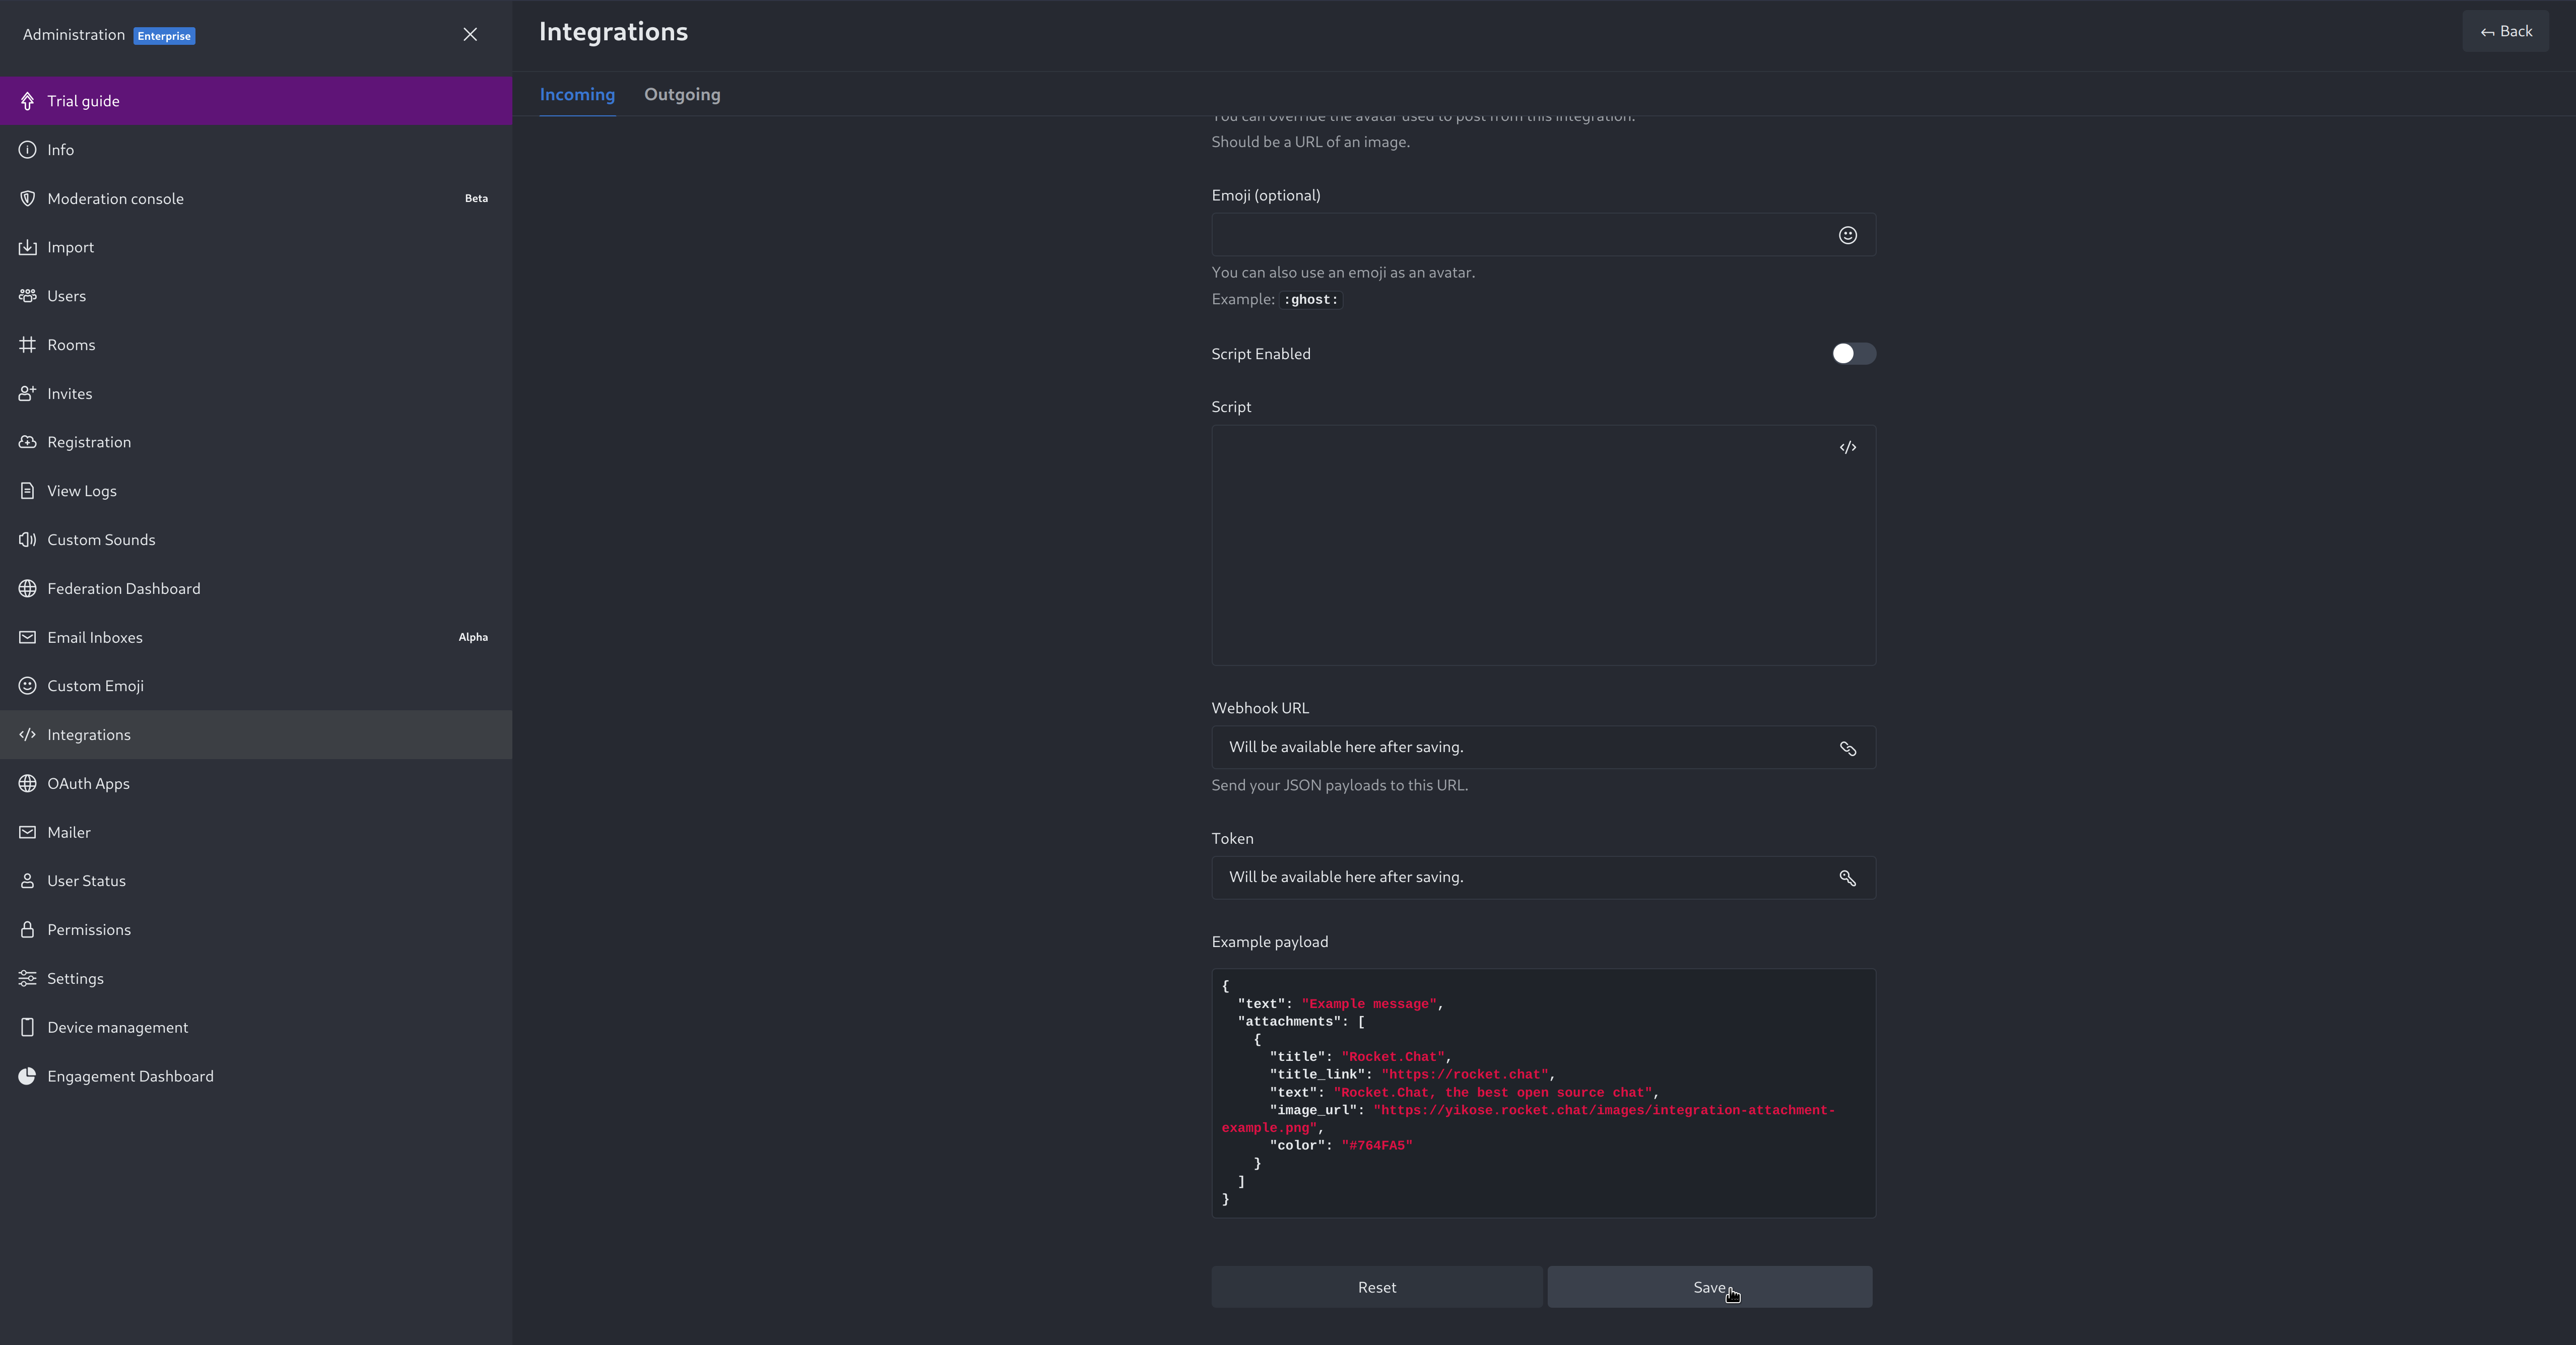 + +4. You will end up with a webhook endpoint that looks like so: +``` +https://your-server.rocket.chat/hooks/YYYYYYYYYYYYYYYYYYYYYYYY/XXXXXXXXXXXXXXXXXXXXXXXXXXXXXXXXXXXXXXXXXXXXXXXX +``` + - Treat this endpoint as a secret. Anyone who has it will be able to post messages to your RocketChat instance. + +For more details please check RocketChat's article [Incoming webhooks for RocketChat](https://docs.rocket.chat/use-rocket.chat/workspace-administration/integrations/). diff --git a/docs/cloud/manage/invite-your-team.md b/docs/cloud/manage/invite-your-team.md deleted file mode 100644 index da2d51f7f..000000000 --- a/docs/cloud/manage/invite-your-team.md +++ /dev/null @@ -1,24 +0,0 @@ -# Invite your team - -Invite your entire SRE, DevOPs, or ITOps team to Netdata Cloud, to give everyone insights into your infrastructure from a single pane of glass. - -Invite new users to your Space by clicking on **Invite Users** in -the [Space](https://github.com/netdata/netdata/blob/master/docs/cloud/spaces.md) management area. - -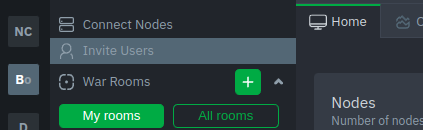 - - -You will be prompted to enter the email addresses for the users you want to invite to your Space. You can enter any number of email addresses, separated by a comma, to send multiple invitations at once. - -Next, choose the War Rooms you want to invite these users to. Once logged in, these users are not restricted only to -these War Rooms. They can be invited to others, or join any that are public. - -Next, pick a role for the invited user. You can read more about [which roles are available](https://github.com/netdata/netdata/blob/master/docs/cloud/manage/role-based-access.md#what-roles-are-available) based on your [subscription plan](https://github.com/netdata/netdata/blob/master/docs/cloud/manage/plans.md). - -Click the **Send** button to send an email invitation, which will prompt them -to [sign up](https://github.com/netdata/netdata/blob/master/docs/cloud/manage/sign-in.md) and join your Space. - -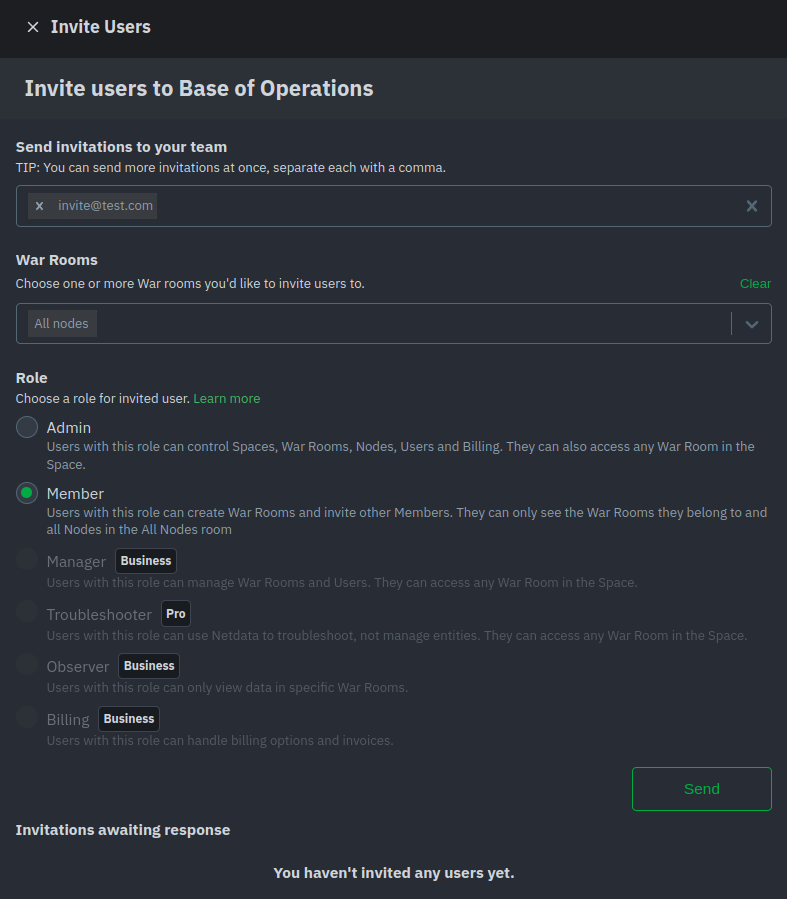 - -Any unaccepted invitations remain under **Invitations awaiting response**. These invitations can be rescinded at any -time by clicking the trash can icon. diff --git a/docs/cloud/manage/organize-your-infrastrucutre-invite-your-team.md b/docs/cloud/manage/organize-your-infrastrucutre-invite-your-team.md new file mode 100644 index 000000000..95bc1741d --- /dev/null +++ b/docs/cloud/manage/organize-your-infrastrucutre-invite-your-team.md @@ -0,0 +1,169 @@ +# Organize Your Infrastructure and Invite your Team + +Netdata Cloud provides you with features such as [Spaces](#netdata-cloud-spaces) and [War Rooms](#netdata-cloud-war-rooms) that allow you to better organize your infrastructure and ensure your team can also have access to it through invites. + +## Netdata Cloud Spaces + +Organize your multi-organization infrastructure monitoring on Netdata Cloud by creating Spaces to completely isolate access to your Agent-monitored nodes. + +A Space is a high-level container. It's a collaboration space where you can organize team members, access levels and the +nodes you want to monitor. + +Let's talk through some strategies for creating the most intuitive Cloud experience for your team. + +### How to organize your Netdata Cloud + +You can use any number of Spaces you want, but as you organize your Cloud experience, keep in mind that _you can only +add any given node to a single Space_. This 1:1 relationship between node and Space may dictate whether you use one +encompassing Space for your entire team and separate them by War Rooms, or use different Spaces for teams monitoring +discrete parts of your infrastructure. + +If you have been invited to Netdata Cloud by another user by default you will able to see that space. If you are a new +user the first space is already created. + +The other consideration for the number of Spaces you use to organize your Netdata Cloud experience is the size and +complexity of your organization. + +For smaller teams and infrastructures, we recommend sticking to a single Space so that you can keep all your nodes and their +respective metrics in one place. You can then use +multiple [War Rooms](#netdata-cloud-war-rooms) +to further organize your infrastructure monitoring. + +Enterprises may want to create multiple Spaces for each of their larger teams, particularly if those teams have +different responsibilities or parts of the overall infrastructure to monitor. For example, you might have one SRE team +for your user-facing SaaS application and a second team for infrastructure tooling. If they don't need to monitor the +same nodes, you can create separate Spaces for each team. + +### Navigate between spaces + +Click on any of the boxes to switch between available Spaces. + +Netdata Cloud abbreviates each Space to the first letter of the name, or the first two letters if the name is two words +or more. Hover over each icon to see the full name in a tooltip. + +To add a new Space click on the green **+** button. Enter the name of the Space and click **Save**. + + + +### Manage Spaces + +Manage your spaces by selecting a particular space and clicking on the small gear icon in the lower left corner. This +will open a side tab in which you can: + +1. _Configure this Space*_, in the first tab (**Space**) you can change the name, description or/and some privilege + options of this space + +2. _Edit the War Rooms*_, click on the **War rooms** tab to add or remove War Rooms. + +3. _Connect nodes*_, click on **Nodes** tab. Copy the claiming script to your node and run it. See the + [connect to Cloud doc](https://github.com/netdata/netdata/blob/master/claim/README.md) for details. + +4. _Manage the users*_, click on **Users**. + The [invitation doc](#invite-your-team) + details the invitation process. + +5. _Manage notification setting*_, click on **Notifications** tab to turn off/on notification methods. + +6. _Manage your bookmarks*_, click on the **Bookmarks** tab to add or remove bookmarks that you need. + +> #### Note +> +> \* This action requires admin rights for this space + +### Obsoleting offline nodes from a Space + +Netdata admin users now have the ability to remove obsolete nodes from a space. + +- Only admin users have the ability to obsolete nodes +- Only offline nodes can be marked obsolete (Live nodes and stale nodes cannot be obsoleted) +- Node obsoletion works across the entire space, so the obsoleted node will be removed from all rooms belonging to the + space +- If the obsoleted nodes eventually become live or online once more they will be automatically re-added to the space + + + +## Netdata Cloud War rooms + +Netdata Cloud uses War Rooms to organize your connected nodes and provide infrastructure-wide dashboards using real-time metrics and visualizations. + +Once you add nodes to a Space, all of your nodes will be visible in the **All nodes** War Room. This is a special War Room +which gives you an overview of all of your nodes in this particular Space. Then you can create functional separations of +your nodes into more War Rooms. Every War Room has its own dashboards, navigation, indicators, and management tools. + +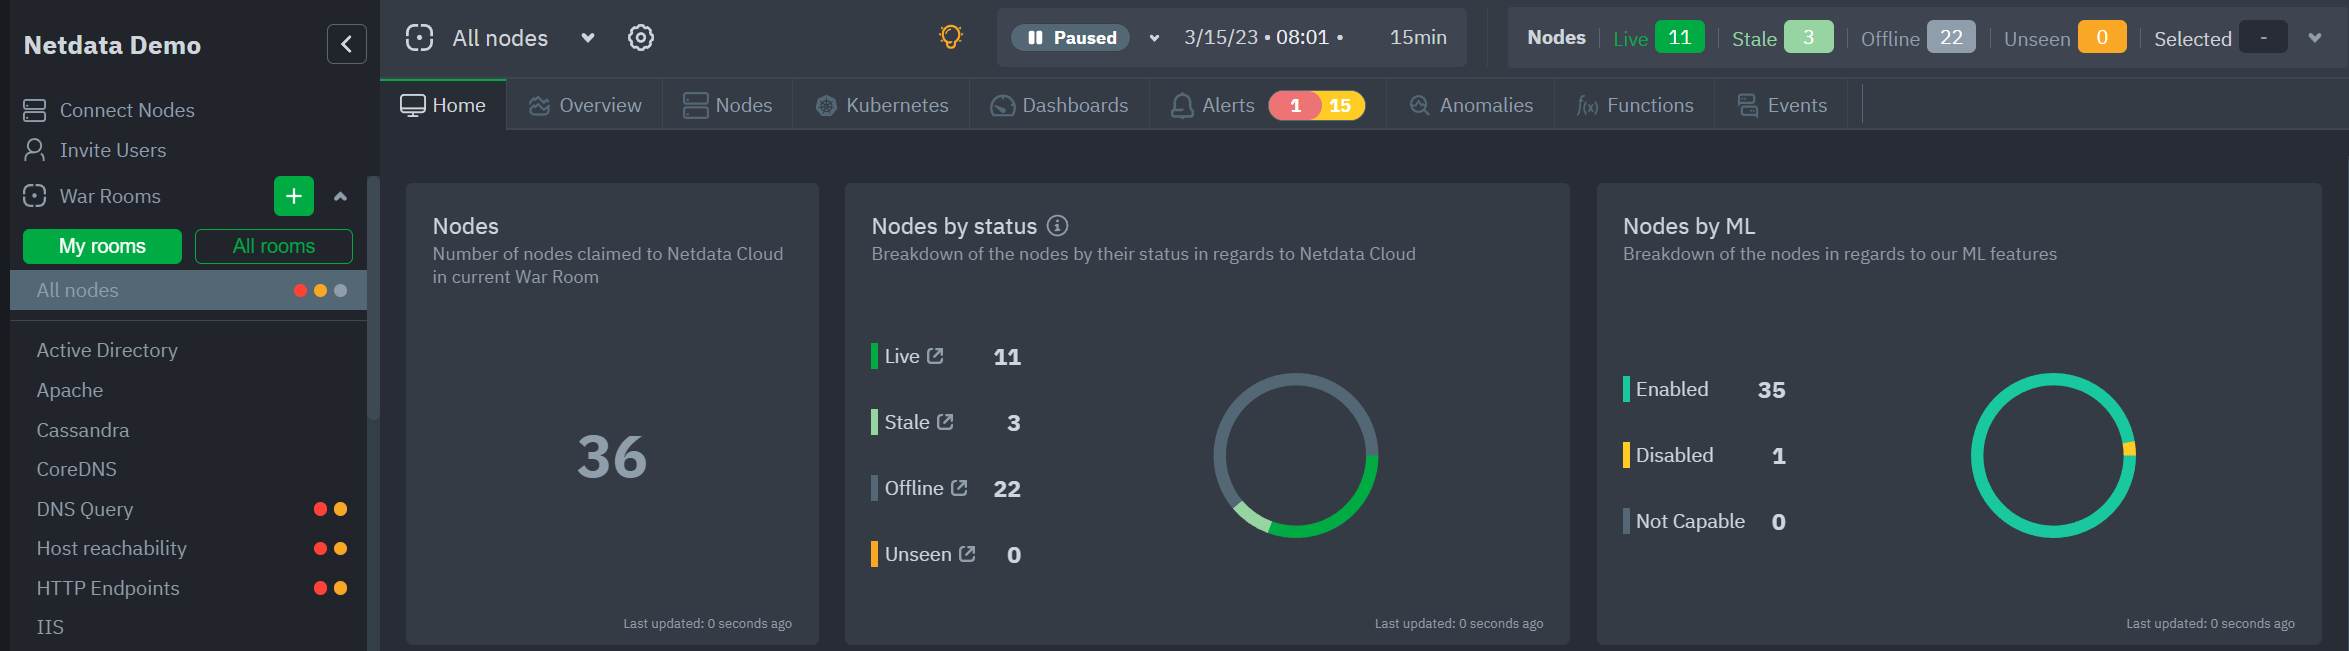 + +### War Room organization + +We recommend a few strategies for organizing your War Rooms. + +- **Service, purpose, location, etc.** + You can group War Rooms by a service (Nginx, MySQL, Pulsar, and so on), their purpose (webserver, database, application), their physical location, whether they're "bare metal" or a Docker container, the PaaS/cloud provider it runs on, and much more. + This allows you to see entire slices of your infrastructure by moving from one War Room to another. + +- **End-to-end apps/services** + If you have a user-facing SaaS product, or an internal service that this said product relies on, you may want to monitor that entire stack in a single War Room. This might include Kubernetes clusters, Docker containers, proxies, databases, web servers, brokers, and more. + End-to-end War Rooms are valuable tools for ensuring the health and performance of your organization's essential services. + +- **Incident response** + You can also create new War Rooms as one of the first steps in your incident response process. + For example, you have a user-facing web app that relies on Apache Pulsar for a message queue, and one of your nodes using the [Pulsar collector](https://github.com/netdata/go.d.plugin/blob/master/modules/pulsar/README.md) begins reporting a suspiciously low messages rate. + You can create a War Room called `$year-$month-$day-pulsar-rate`, add all your Pulsar nodes in addition to nodes they connect to, and begin diagnosing the root cause in a War Room optimized for getting to resolution as fast as possible. + +### Add War Rooms + +To add new War Rooms to any Space, click on the green plus icon **+** next to the **War Rooms** heading on the left (Space's) sidebar. + +In the panel, give the War Room a name and description, and choose whether it's public or private. +Anyone in your Space can join public War Rooms, but can only join private War Rooms with an invitation. + +### Manage War Rooms + +All the users and nodes involved in a particular Space can be part of a War Room. + +Any user can change simple settings of a War room, like the name or the users participating in it. +Click on the gear icon of the War Room's name in the top of the page to do that. A sidebar will open with options for this War Room: + +1. To **change a War Room's name, description, or public/private status**, click on **War Room** tab. + +2. To **include an existing node** to a War Room or **connect a new node\*** click on **Nodes** tab. Choose any connected node you want to add to this War Room by clicking on the checkbox next to its hostname, then click **+ Add** at the top of the panel. + +3. To **add existing users to a War Room**, click on **Add Users**. + See our [invite doc](#invite-your-team.md) for details on inviting new users to your Space in Netdata Cloud. + +> #### Note +> +>\* This action requires **admin** rights for this Space + +#### More actions + +To **view or remove nodes** in a War Room, click on the **Nodes tab**. To remove a node from the current War Room, click on +the **🗑** icon. + +> #### Info +> +> Removing a node from a War Room does not remove it from your Space. + +## Invite your team + +Invite your entire SRE, DevOPs, or ITOps team to Netdata Cloud, to give everyone insights into your infrastructure from a single pane of glass. + +Invite new users to your Space by clicking on **Invite Users** in +the [Space](#netdata-cloud-spaces) management area. + + + + +You will be prompted to enter the email addresses of the users you want to invite to your Space. You can enter any number of email addresses, separated by a comma, to send multiple invitations at once. + +Next, choose the War Rooms you want to invite these users to. Once logged in, these users are not restricted only to +these War Rooms. They can be invited to others, or join any that are public. + +Next, pick a role for the invited user. You can read more about [which roles are available](https://github.com/netdata/netdata/blob/master/docs/cloud/manage/role-based-access.md#what-roles-are-available) based on your [subscription plan](https://github.com/netdata/netdata/blob/master/docs/cloud/manage/plans.md). + +Click the **Send** button to send an email invitation, which will prompt them +to [sign up](https://github.com/netdata/netdata/blob/master/docs/cloud/manage/sign-in.md) and join your Space. + + + +Any unaccepted invitations remain under **Invitations awaiting response**. These invitations can be rescinded at any +time by clicking the trash can icon. diff --git a/docs/cloud/manage/plans.md b/docs/cloud/manage/plans.md index 23077f898..f84adaa8e 100644 --- a/docs/cloud/manage/plans.md +++ b/docs/cloud/manage/plans.md @@ -113,7 +113,7 @@ For more details check the documentation under [Alert Notifications](https://git #### **Related Concepts** -* [Spaces](https://github.com/netdata/netdata/blob/master/docs/cloud/spaces.md) +* [Spaces](https://github.com/netdata/netdata/blob/master/docs/cloud/manage/organize-your-infrastrucutre-invite-your-team.md#netdata-cloud-spaces) * [Alert Notifications](https://github.com/netdata/netdata/blob/master/docs/cloud/alerts-notifications/notifications.md) * [Events feed](https://github.com/netdata/netdata/blob/master/docs/cloud/insights/events-feed.md) * [Role-Based Access model](https://github.com/netdata/netdata/blob/master/docs/cloud/manage/role-based-access.md) diff --git a/docs/cloud/netdata-assistant.md b/docs/cloud/netdata-assistant.md new file mode 100644 index 000000000..afa13f6e9 --- /dev/null +++ b/docs/cloud/netdata-assistant.md @@ -0,0 +1,20 @@ +# Alert troubleshooting with Netdata Assistant + +The Netdata Assistant is a feature that uses large language models and the Netdata community's collective knowledge to guide you during troubleshooting. It is designed to make understanding and root causing alerts simpler and faster. + +## Using Netdata Assistant + +- Navigate to the alerts tab +- If there are active alerts, the `Actions` column will have an Assistant button + + 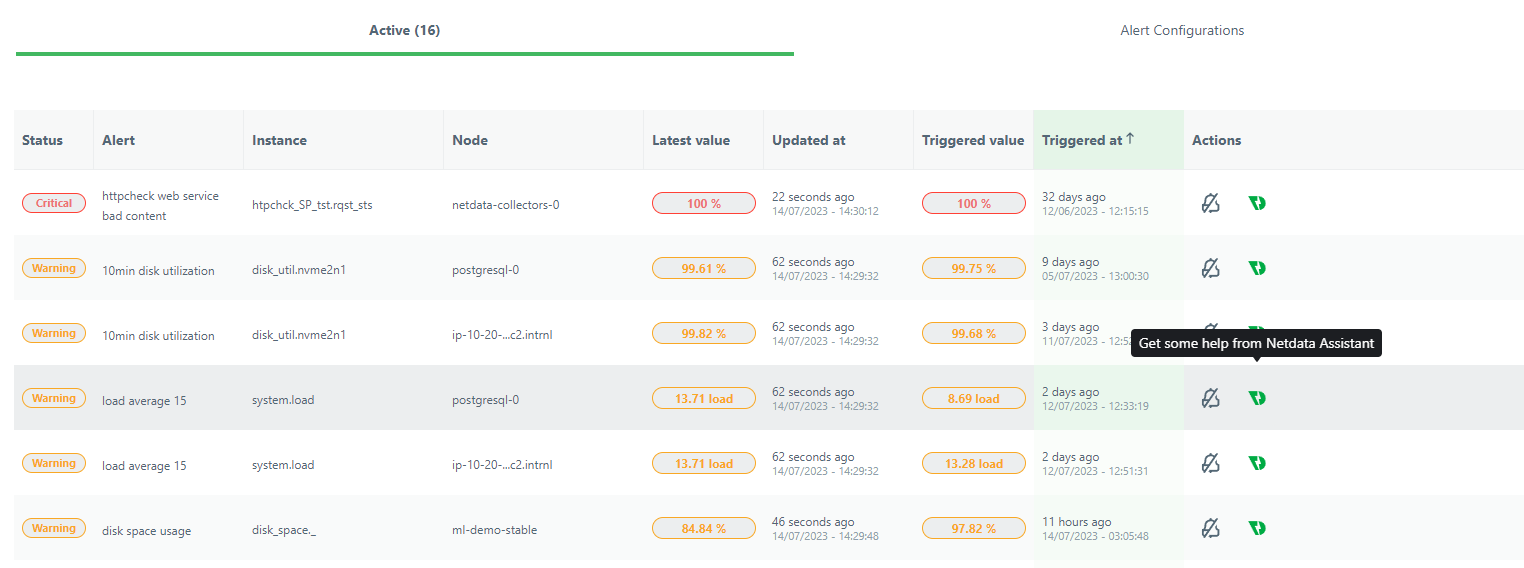 + +- Clicking on the Assistant button opens up as a floating window with customized information and troubleshooting tips for this alert (note that the window can follow you through your troubleshooting journey on Netdata dashboards) + + 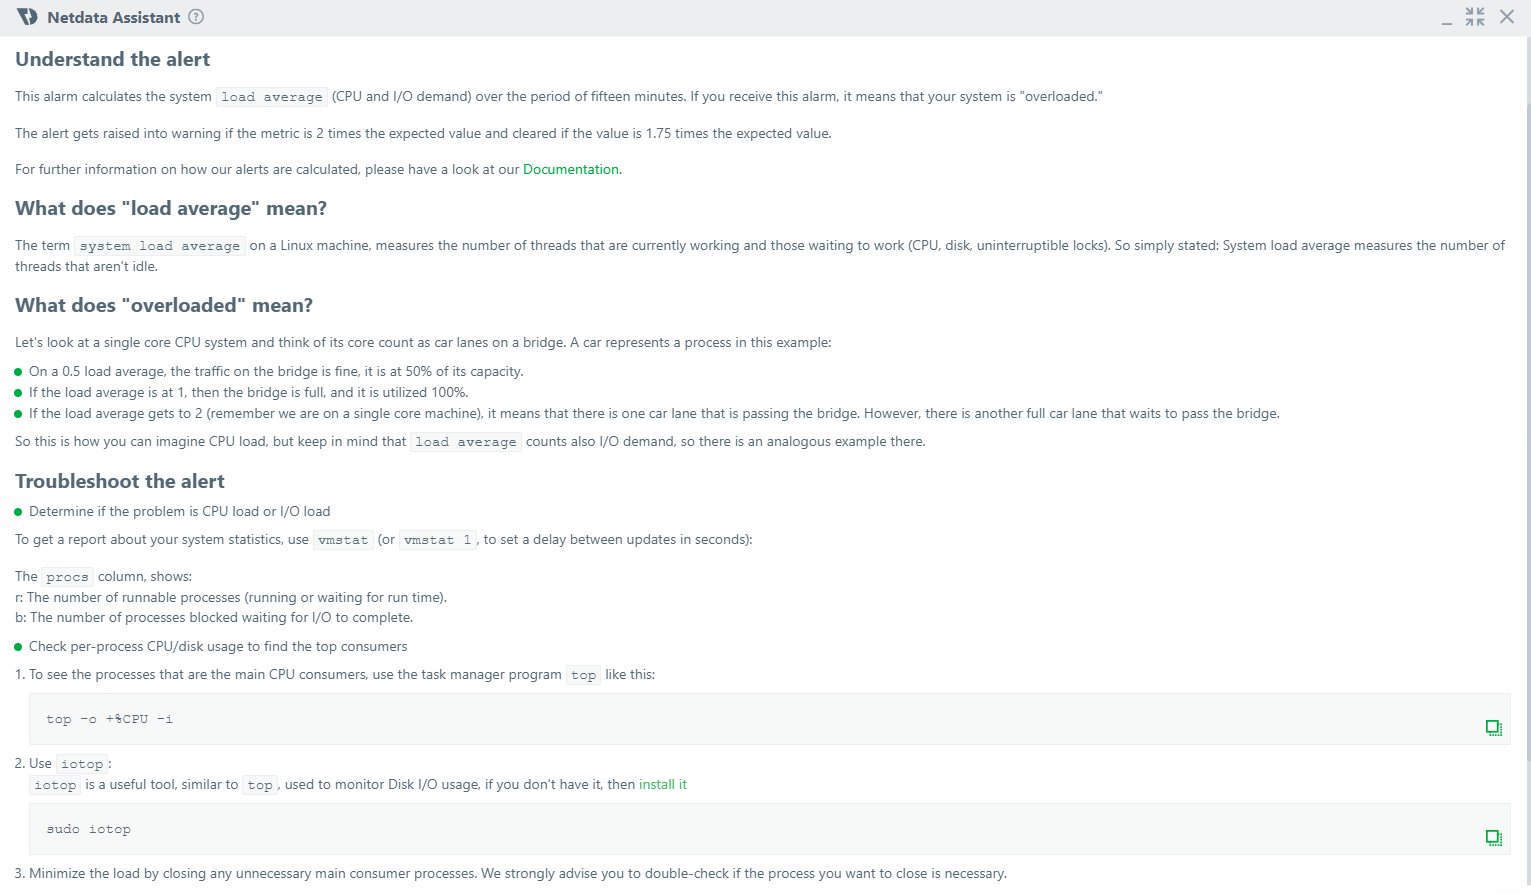 + +- In case you need more information, or want to understand deeper, Netdata Assistant also provides useful web links to resources that can help. + +  + +- If there are no active alerts, you can still use Netdata Assistant by clicking the Assistant button on the Alert Configuration view. diff --git a/docs/cloud/netdata-functions.md b/docs/cloud/netdata-functions.md index 9fcf732cb..8e9415eb3 100644 --- a/docs/cloud/netdata-functions.md +++ b/docs/cloud/netdata-functions.md @@ -33,6 +33,7 @@ functions - [plugins.d](https://github.com/netdata/netdata/blob/master/collector | Function | Description | plugin - module | | :-- | :-- | :-- | | processes | Detailed information on the currently running processes on the node. | [apps.plugin](https://github.com/netdata/netdata/blob/master/collectors/apps.plugin/README.md) | +| ebpf_thread | Controller for eBPF threads. | [ebpf.plugin](https://github.com/netdata/netdata/blob/master/collectors/ebpf.plugin/README.md) | If you have ideas or requests for other functions: * open a [Feature request](https://github.com/netdata/netdata-cloud/issues/new?assignees=&labels=feature+request%2Cneeds+triage&template=FEAT_REQUEST.yml&title=%5BFeat%5D%3A+) on Netdata Cloud repo diff --git a/docs/cloud/spaces.md b/docs/cloud/spaces.md deleted file mode 100644 index 2a275c14c..000000000 --- a/docs/cloud/spaces.md +++ /dev/null @@ -1,79 +0,0 @@ -# Netdata Cloud Spaces - -Organize your multi-organization infrastructure monitoring on Netdata Cloud by creating Spaces to completely isolate access to your Agent-monitored nodes. - -A Space is a high-level container. It's a collaboration space where you can organize team members, access levels and the -nodes you want to monitor. - -Let's talk through some strategies for creating the most intuitive Cloud experience for your team. - -## How to organize your Netdata Cloud - -You can use any number of Spaces you want, but as you organize your Cloud experience, keep in mind that _you can only -add any given node to a single Space_. This 1:1 relationship between node and Space may dictate whether you use one -encompassing Space for your entire team and separate them by War Rooms, or use different Spaces for teams monitoring -discrete parts of your infrastructure. - -If you have been invited to Netdata Cloud by another user by default you will able to see this space. If you are a new -user the first space is already created. - -The other consideration for the number of Spaces you use to organize your Netdata Cloud experience is the size and -complexity of your organization. - -For small team and infrastructures we recommend sticking to a single Space so that you can keep all your nodes and their -respective metrics in one place. You can then use -multiple [War Rooms](https://github.com/netdata/netdata/blob/master/docs/cloud/war-rooms.md) -to further organize your infrastructure monitoring. - -Enterprises may want to create multiple Spaces for each of their larger teams, particularly if those teams have -different responsibilities or parts of the overall infrastructure to monitor. For example, you might have one SRE team -for your user-facing SaaS application and a second team for infrastructure tooling. If they don't need to monitor the -same nodes, you can create separate Spaces for each team. - -## Navigate between spaces - -Click on any of the boxes to switch between available Spaces. - -Netdata Cloud abbreviates each Space to the first letter of the name, or the first two letters if the name is two words -or more. Hover over each icon to see the full name in a tooltip. - -To add a new Space click on the green **+** button . Enter the name of the Space and click **Save**. - - - -## Manage Spaces - -Manage your spaces by selecting in a particular space and clicking in the small gear icon in the lower left corner. This -will open a side tab in which you can: - -1. _Configure this Space*_, in the first tab (**Space**) you can change the name, description or/and some privilege - options of this space - -2. _Edit the War Rooms*_, click on the **War rooms** tab to add or remove War Rooms. - -3. _Connect nodes*_, click on **Nodes** tab. Copy the claiming script to your node and run it. See the - [connect to Cloud doc](https://github.com/netdata/netdata/blob/master/claim/README.md) for details. - -4. _Manage the users*_, click on **Users**. - The [invitation doc](https://github.com/netdata/netdata/blob/master/docs/cloud/manage/invite-your-team.md) - details the invitation process. - -5. _Manage notification setting*_, click on **Notifications** tab to turn off/on notification methods. - -6. _Manage your bookmarks*_, click on the **Bookmarks** tab to add or remove bookmarks that you need. - -> ### Note -> -> \* This action requires admin rights for this space - -## Obsoleting offline nodes from a Space - -Netdata admin users now have the ability to remove obsolete nodes from a space. - -- Only admin users have the ability to obsolete nodes -- Only offline nodes can be marked obsolete (Live nodes and stale nodes cannot be obsoleted) -- Node obsoletion works across the entire space, so the obsoleted node will be removed from all rooms belonging to the - space -- If the obsoleted nodes eventually become live or online once more they will be automatically re-added to the space - - diff --git a/docs/cloud/visualize/dashboards.md b/docs/cloud/visualize/dashboards.md index a9376db17..8291d6f1f 100644 --- a/docs/cloud/visualize/dashboards.md +++ b/docs/cloud/visualize/dashboards.md @@ -106,6 +106,6 @@ Because of the visual complexity of individual charts, dashboards require a mini ## What's next? Once you've designed a dashboard or two, make sure -to [invite your team](https://github.com/netdata/netdata/blob/master/docs/cloud/manage/invite-your-team.md) if +to [invite your team](https://github.com/netdata/netdata/blob/master/docs/cloud/manage/organize-your-infrastrucutre-invite-your-team.md#invite-your-team) if you haven't already. You can add these new users to the same War Room to let them see the same dashboards without any effort. diff --git a/docs/cloud/visualize/kubernetes.md b/docs/cloud/visualize/kubernetes.md index 46e46bc18..82c33fd3e 100644 --- a/docs/cloud/visualize/kubernetes.md +++ b/docs/cloud/visualize/kubernetes.md @@ -79,7 +79,7 @@ and `k8s_node_name`. The default is `k8s_controller_name`. ### Filtering -Filtering behaves identically to the [node filter in War Rooms](https://github.com/netdata/netdata/blob/master/docs/cloud/war-rooms.md#node-filter), with the ability to +Filtering behaves identically to the [node filter in War Rooms](https://github.com/netdata/netdata/blob/master/docs/cloud/visualize/node-filter.md), with the ability to filter pods/containers by `container_id` and `namespace`. ### Detailed information diff --git a/docs/cloud/visualize/nodes.md b/docs/cloud/visualize/nodes.md index 4160166f7..b770c1b8e 100644 --- a/docs/cloud/visualize/nodes.md +++ b/docs/cloud/visualize/nodes.md @@ -14,9 +14,9 @@ real-time charts. Use the [Overview](https://github.com/netdata/netdata/blob/master/docs/cloud/visualize/overview.md) for monitoring an infrastructure in real time using composite charts and Netdata's familiar dashboard UI. -Check the [War Room docs](https://github.com/netdata/netdata/blob/master/docs/cloud/war-rooms.md) for details on the utility bar, which contains the [node -filter](https://github.com/netdata/netdata/blob/master/docs/cloud/war-rooms.md#node-filter) and the [timeframe -selector](https://github.com/netdata/netdata/blob/master/docs/cloud/war-rooms.md#play-pause-force-play-and-timeframe-selector). +Check the [node +filter](https://github.com/netdata/netdata/blob/master/docs/cloud/visualize/node-filter.md) and the [Visualization date time controls +selector](https://github.com/netdata/netdata/blob/master/docs/dashboard/visualization-date-and-time-controls.md) for tools available on the utility bar. ## Add and customize metrics columns diff --git a/docs/cloud/war-rooms.md b/docs/cloud/war-rooms.md deleted file mode 100644 index c599fd5b4..000000000 --- a/docs/cloud/war-rooms.md +++ /dev/null @@ -1,60 +0,0 @@ -# Netdata Cloud War rooms - -Netdata Cloud uses War Rooms to organize your connected nodes and provide infrastructure-wide dashboards using real-time metrics and visualizations. - -Once you add nodes to a Space, all of your nodes will be visible in the **All nodes** War Room. This is a special War Room -which gives you an overview of all of your nodes in this particular Space. Then you can create functional separations of -your nodes into more War Rooms. Every War Room has its own dashboards, navigation, indicators, and management tools. - - - -## War Room organization - -We recommend a few strategies for organizing your War Rooms. - -- **Service, purpose, location, etc.** - You can group War Rooms by a service (Nginx, MySQL, Pulsar, and so on), their purpose (webserver, database, application), their physical location, whether they're "bare metal" or a Docker container, the PaaS/cloud provider it runs on, and much more. - This allows you to see entire slices of your infrastructure by moving from one War Room to another. - -- **End-to-end apps/services** - If you have a user-facing SaaS product, or an internal service that this said product relies on, you may want to monitor that entire stack in a single War Room. This might include Kubernetes clusters, Docker containers, proxies, databases, web servers, brokers, and more. - End-to-end War Rooms are valuable tools for ensuring the health and performance of your organization's essential services. - -- **Incident response** - You can also create new War Rooms as one of the first steps in your incident response process. - For example, you have a user-facing web app that relies on Apache Pulsar for a message queue, and one of your nodes using the [Pulsar collector](https://github.com/netdata/go.d.plugin/blob/master/modules/pulsar/README.md) begins reporting a suspiciously low messages rate. - You can create a War Room called `$year-$month-$day-pulsar-rate`, add all your Pulsar nodes in addition to nodes they connect to, and begin diagnosing the root cause in a War Room optimized for getting to resolution as fast as possible. - -## Add War Rooms - -To add new War Rooms to any Space, click on the green plus icon **+** next the **War Rooms** heading on the left (Space's) sidebar. - -In the panel, give the War Room a name and description, and choose whether it's public or private. -Anyone in your Space can join public War Rooms, but can only join private War Rooms with an invitation. - -## Manage War Rooms - -All the users and nodes involved in a particular Space can be part of a War Room. - -Any user can change simple settings of a War room, like the name or the users participating in it. -Click on the gear icon of the War Room's name in the top of the page to do that. A sidebar will open with options for this War Room: - -1. To **change a War Room's name, description, or public/private status**, click on **War Room** tab. - -2. To **include an existing node** to a War Room or **connect a new node\*** click on **Nodes** tab. Choose any connected node you want to add to this War Room by clicking on the checkbox next to its hostname, then click **+ Add** at the top of the panel. - -3. To **add existing users to a War Room**, click on **Add Users**. - See our [invite doc](https://github.com/netdata/netdata/blob/master/docs/cloud/manage/invite-your-team.md) for details on inviting new users to your Space in Netdata Cloud. - -> ### Note -> ->\* This action requires **admin** rights for this Space - -### More actions - -To **view or remove nodes** in a War Room, click on the **Nodes tab**. To remove a node from the current War Room, click on -the **🗑** icon. - -> ### Info -> -> Removing a node from a War Room does not remove it from your Space. |